Relay Upgrade for a Starter Motor
If your car has a good battery but still makes a clicking sound instead of starting then chances are you need to do this simple upgrade.
The Problem
Cars normally use a power feed though the ignition switch to activate the solenoid on the starter motor. Over time the contact wear out, cause a high resistance connection which then causes voltage drop to the solenoid. Once the power level available to the solenoid drops low enough the solenoid does not have enough power to properly engage. This is characterized by a clicking sound upon trying to start the vehicle.
Terms
The following terms are used:
Main power feed – The large cable that comes directly off the battery and is bolted down to the outer edge of the back of the starter motor itself.
Solenoid power lead- The cable that is part of the original body loom of the engine bay that is ran across the top of the firewall, down to the starter motor and then onto a male spade fitting at the back inner side of the starter.
The Solution
While this problem can only be fixed to original specifications by fitting a new ignition barrel and contacts there luckily is easy to avoid this problem that’s superior to the original design. This is by installing a relay that bridges the power directly from the starter motor supply to the solenoid itself and only uses the power from the ignition barrel to active the relay. This way the power used for the solenoid doesn’t’t have to travel up the loom, into the barrel, through the contacts and finally back through the loom to the solenoid. It instead just uses goes from the main power feed for the starter motor through the relay and back into the solenoid. To hook this up a normal “horn relay” is used and for the following connection guide the pin numbers that are located on the bottom are referred to. Every standard relay has these connection pin numbers molded into them. Only a 4 pin relay is needed but a 5 pin can be used with the 87a pin being ignored.
Connection
Firstly mount the relay in a practical location near the starter motor itself. Many blocks have used M6 tapped holes in them that can be used. The relay needs to be close enough so that it can be reached by the original starter motor solenoid lead once it is moved. The connections for the relay are shown below.
Pin 30 – To the main positive power feed cable on the starter motor. Ideally a ring lug is used and is put on the same stud as the main power cable and then run to the relay. However this is an un-common lug to find and it is possible to undo the nut on the stud, pull the main power lead lug forward and loop the small wire around the stud in a clockwise direction before clamping the main power lug back on.
Pin 85 – The original lead that comes from the firewall to the back of the solenoid needs to be taken off, this is a spade connection and needs to be moved so that it directly plugs into this terminal on the relay.
Pin 86 – To a ground connection, by far the neatest and simplest solution to this is quite simple a lead that goes from this terminal to a round lug with a 6mm hole that goes under the same bolt that is holding the relay to the block. This way The lead is only a basic loop from the terminal to the mounting bolt. The mounting bolt with short the lug to ground once fitted.
Pin 87 – To the connection on the back of the solenoid which the original lead from the firewall was originally connected.

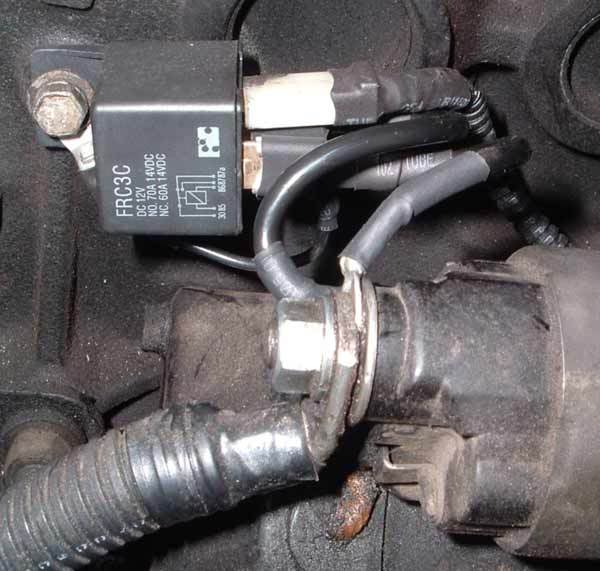
Starter relayStarter relay An example of how a relay has been bolted to the block next to the starter motor so as to keep the wires as short and neat as possible.