4A to W5x conversion kit install guide

Flywheel and clutch options / compatibility
– All of the original 16 and 20V 4age flywheels can be used with this adapter. The 4agze flywheels (225 + 230mm) however don’t physically fit inside the T50 bellhousing and therefore can’t be used.
– The early 16V bigport engines used a flywheel with a 200mm diameter friction disk, while the later 4age engines used a 212mm. Both of these can be used if the matching clutch is fitted but the larger 212mm type is suggested. Also some clutch companies quote the 212mm size to be 215mm.
– Aftermarket replacement options for OEM 4AGE flywheels: For those without an existing 200 / 212mm 4AGE flywheel to reuse there are various aftermarket options. For example in the Xtreme brand there two different models offered to suit 212mm clutches: 1- A 5.1Kg flywheel (FTY007C) and an even lighter again model at 4.1Kg (FTY007CL). Both of these are significantly lighter than any of the OEM flywheels so take caution with your choice.
– Clutch pressure plate – UNCHANGED: A 4AGE pressure plate is still used with this adapter, and as such it just needs to be of a model that suits whatever type of 4AGE flywheel it’s fitted to – so either 200mm or 212/215mm.
WARNING: It has been reported that it could be possible to have a material compatibility issue that requires the pressure plate to suit the and the same type of friction disk. For example- in these possible applications a pressure plate intended for a disk that uses an organic compound shouldn’t be mixed with a multi-puck or button disk. If unsure, call up the clutch company to confirm compatibility. Better yet, buy your clutch and pressure plate as a kit from one manufacturer.
– Friction disk: With this adapter the clutch pressure plate intended for another model engine is used. See the part numbers in the next section.
– Clutch fork and slave cylinder- UNCHANGED: The clutch fork and slave cylinder are re-used from the T50 gearbox.
– Clutch thrust bearing carrier: A custom W5x carrier is supplied with this adapter kit.
– Clutch carrier clips – UNCHANGED: Both the W-series and the T50 type gearboxes use the same model clips.
Compatible clutch part numbers – 200mm
– Friction disk option 1 – organic: Exedy: TYD126U
– Friction disk option 2 – organic: ClutchPro: DTY2021204
– Friction disk option 3 – 5-button ceramic: Exedy: TYD126B5 – reportedly needs a pressure plate intended for a button disk.
– Friction disk option 4 – 4-puck ceramic: ClutchPro: DTY2021204DSB
Compatible clutch part numbers – 212 / 215mm
– Complete compatible clutch kit: There are some clutch kits available that feature both the same model pressure plate as a 4age along with a friction disk that uses the larger sized center spline to suit. These clutch kits suit some specific models of Australian light commercial vehicles that where originally fitted with 7K / 7KE engines and G52 gearboxes- click here to see a full list. Of note choosing this option is certainly simpler, however due the vehicles they are originally intended for there are much less clutch options available compared to sourcing the clutch disk and pressure plate separately, for example it’s unlikely that a ceramic based clutch would be available unless it was via special request.
– A friction disk option: Exedy: TYD034U – Please click here to see a full list of Australian vehicles that were originally fitted with this type of clutch disk.
– 4AGE Pressure plate option 1 of many – Heavy duty: Exedy: TYC549HD – Rating: 490kg clamping force
– 4AGE Pressure plate option 2 of many – Extra heavy duty: Exedy: TYC613HD – Rating: 680kg clamping force
Alterations to the W5x Gearbox
– Remove the original bellhousing off the W5x series gearbox that the kit will be fitted to. This is along with the original clutch fork and clutch slave is they are not reused for the conversion. Put aside the thrust bearing carrier and the fork to carrier clips.
– The bolts holding down the gearboxes bearing retainer need to be replaced. These are changed from the original flange hex head to the provided button / dome head. To avoid disturbing the gasket it’s suggested to change half at a time. Circled in the picture is how the bolts look once installed.

Adapter plate
– Fit the gearbox adapter plate onto the gearbox housing. The plate has a hole for each of the original dowels in the gearbox housing to locate and slide on to. It is a tight fit and may require a light tap to fit into place.
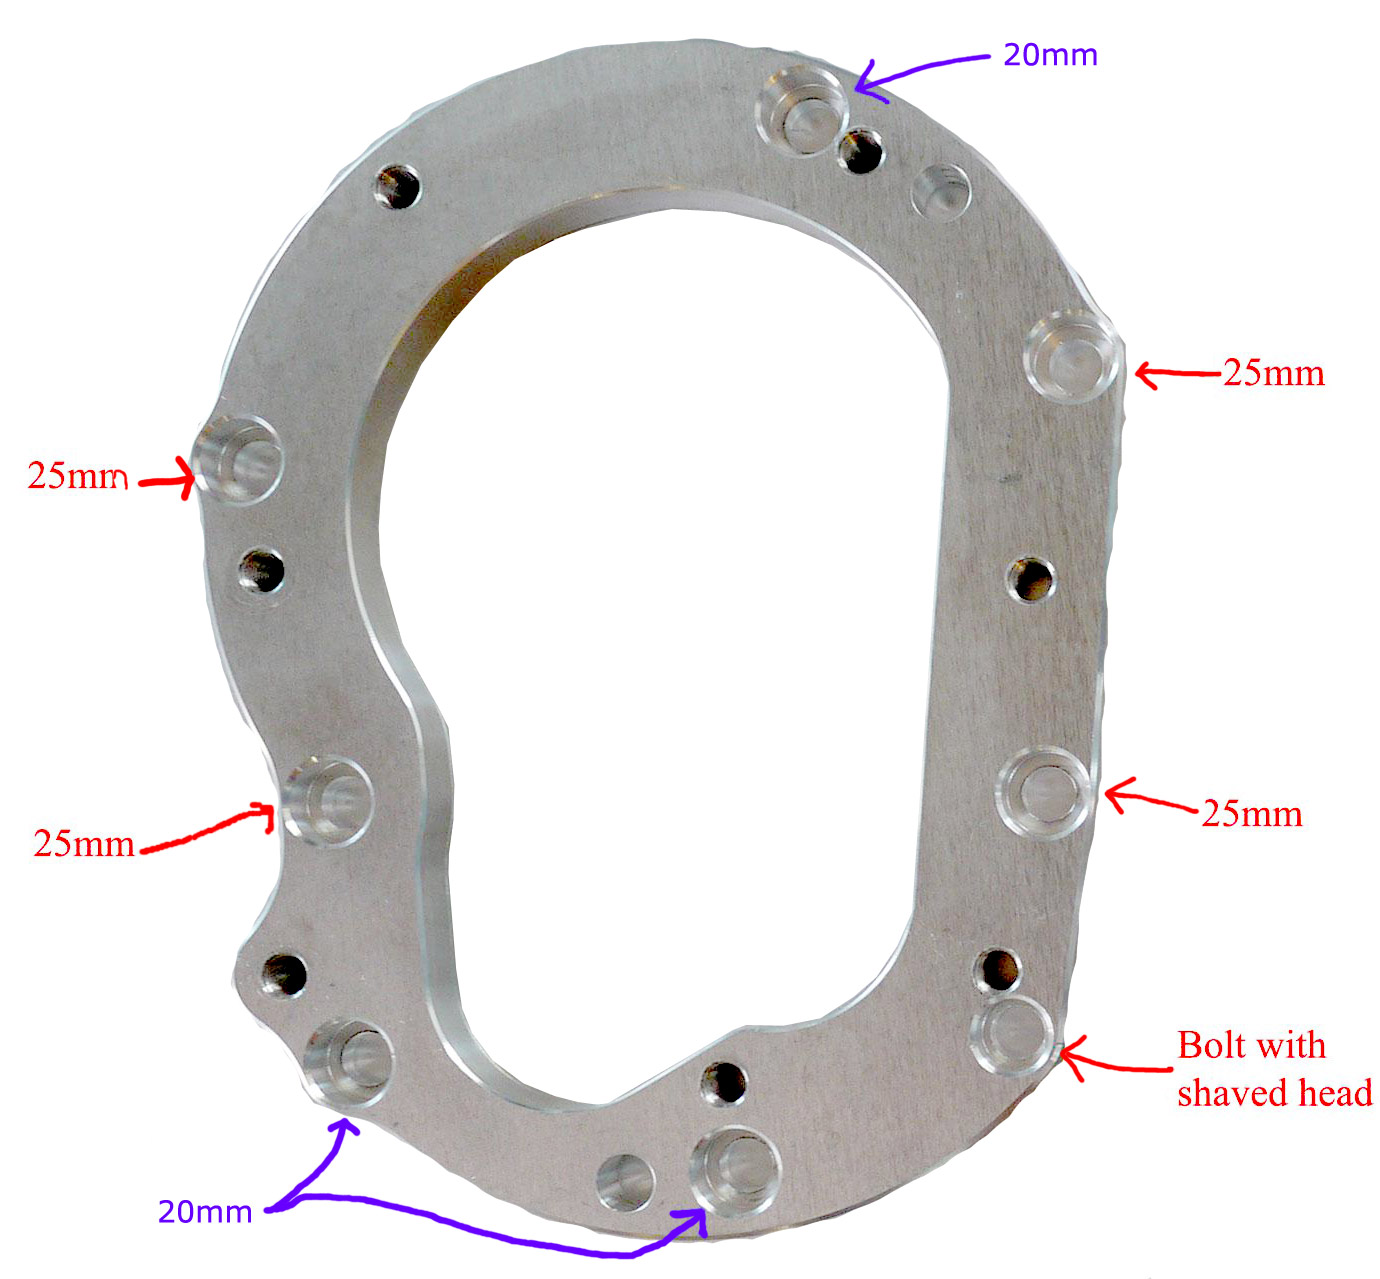
– Use the provided bolts to do fasten the adapter to the gearbox housing. There are 2 different bolt lengths and a single custom bolt with a reduced diameter head.Use the image below as a reference for which length bolts are fitted where.
Work on the original T50 gearbox
– Remove the original bellhousing off the T50 gearbox. Put aside the clutch fork and clips, the clutch slave can remain in place. The original thrust bearing carrier can’t be used for the conversion.
– Clean the back of the bellhousing by scraping off the old gasket material.
– Undo the clutch carrier guide tube housing, this isn’t used for the conversion. This is the part bolted on the inside-middle of the housing via four bolts.
– Using the provided concentric locator and it’s fasteners fit this in the place of the housing that was removed, face so the step in the plate inwards so it locates on the main hole in the back-middle of the bellhousing.
– The back of this original bellhousing will need to have a small amount of metal removed to fit the adapter plate. This does not to be accurate at all and be done with a normal hand grinder, a flapper wheel disk works best. See the picture below which shows the area required to be ground down. This can be made larger with no negative consequence. Once this has been ground test fit the bellhousing into place with the provided hex bolts loosely in place. Push the bellhousing in and see if the rear face sits flat against the adapter plate. If it doesn’t and has an air gap then some more material is required to be removed. Take note of where it’s hitting, remove more material and then test fit again.
– Due to variations between bellhousings one or more of the mounting holes may need a small amount filed to easily clear the bolt when being fitted, this is however unlikely.

– With the provided hex bolts and washers do the bellhousing up to the adapter plate. A single one of the provided bolts is 5mm shorter than the other six, this needs to be fitted to the mounting hole next to the clutch fork ball.
Thrust Bearing and Carrier
– The thrust bearing model remains unchanged. This has the universal part number of 40TRK30W2SB or it’s available through our store.
– If not already done press the above thrust bearing onto the custom clutch bearing carrier as supplied in the kit.
– Before the carrier is fitted back into place apply grease to the inside filling up the grease trap groove in the extension sleeve and slide onto the gearboxes guide tube.
Additional Clutch parts
– Refit the T50 clutch fork and the fork to carrier retainer clips. The fork to carrier clips are the same between both gearboxes, so use new or pick the best condition used pair of the four left over.
Spigot extension
Remove the old spigot bearing, there are various methods for this which are easily found online. Fit new spigot extension into it’s place. This is hammered in by it’s outside, an upside-down socket being tapped with a hammer works well. Do not hit the middle of the bearing to install.