Coilpack Information Guide
Working with coilpacks
This article is about use of coilpacks also known as COP’s (Coil on Plug) which are common on many Toyota engines. We give thanks to Anthony from Kaizen garage who helped with some the content that we have used here.
Coilpack basics
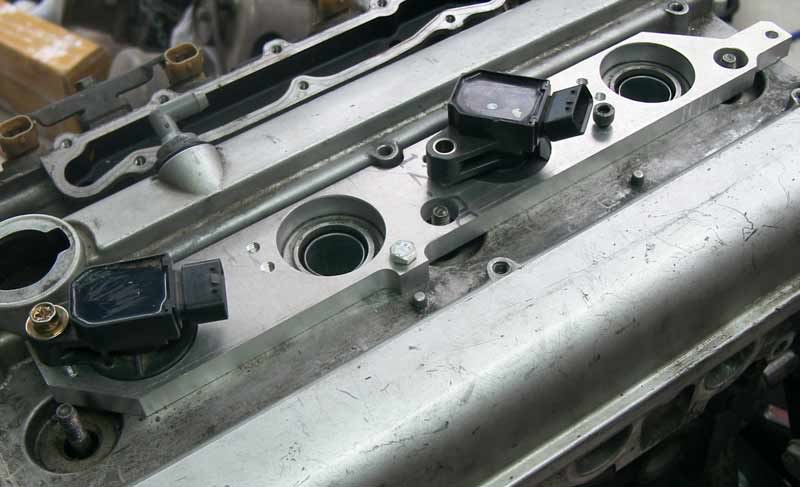
Near if not all of the newer model Toyota petrol engines use individual coils for their ignition systems. These are a very compact coil which is designed to fit directly onto the end of the spark plug and be secured via a single bolt to the cam cover of the engine. With a single coil for each cylinder the use of distributor caps, rotor buttons and ignition leads are all negated.
Toyota coilpack types
Below are five of many different types of coils in use.
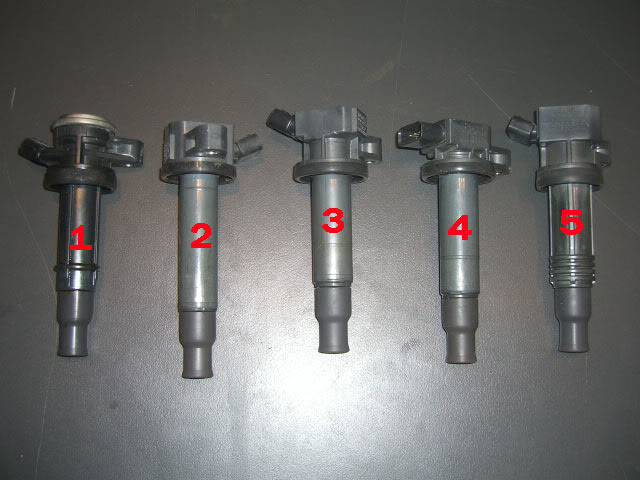
Coil 1: 90919-02227 – 3SGTE – ST215 Caldina
Coil 2: 90919-02230 – 1GFE vvt-i – AS200 Lexus
Coil 3: 90919-02239 – 1ZZFE
Coil 4: 90919-02265 / BIC729 / 90919-02240 – 1NZFE / 2NZFE – See note below
Coil 5: 90919-02236 – 3SGE Beams Blacktop – SXE10 Altezza
– Not pictured are 2AZFE Camry and 2NZFE. Both of these are longer types, which are useful when some extra reach is needed. Similar in length to the GXE10 coils pictured above.
– Coil 4 notes: From when the engines were new the initial manufacturer for the OEM coils was Denso. At a later date there was a transition to coils made to use coils produced by Bosch. Buying from a Bosch parts reseller with the BIC729 part number is the most cost effective way to source new genuine coils.
Electrical connection
Each of the 4-wire Toyota coils feature an inbuilt igniter. This results in a direct connection between the ECU’s ignition outputs and the coils trigger signal input.
The pin connection for most Toyota coils is shown as below. Individuals will need to check the connection of their coils before connection, we can however confirm that what is shown below is correct for both NZ and ZZ series of coils. WARNING: connection of the +12V power to the signal pins will cause damage to coils.
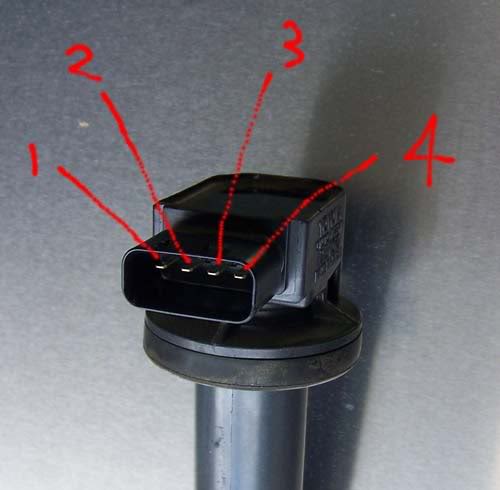
[Pin 1] Earth / common ground: This grounds each coil to the body / earth, an electric connection to to the cam cover alone is not at all suggested.
[Pin 2] IGT / trigger: The signal wire to activate the firing of the coil, triggered directly from the ECU’s ignition output. These can paired with another coil for a waste spark connection, for example using two ECU ignition outputs to run four coilpacks. See the next section for more on this subject.
[Pin 3] IGF / ignition feedback: Used by OEM ECU’s to confirm the firing of the ignition coil. If a coil malfunctions the ECU will sense the lack of this fire confirmation and put itself into a fault / limp mode. This is not normally used at all with an aftermarket /stand-alone ECU and hence only three wires are used for each coil.
[Pin 4] Power (+) / ignition power: This is the main power supply for all of the coils, this power feed is activated when the key is turned to the “Ignition” position. The most common and suggested method of connection during a conversion on a four cylinder is to remove the power feed from the original single ignition coil and use it to power all four of the new coilpacks.
Ignition dwell time / firing duration
As explained in the section above all of the four-pin coilpacks from Toyota have a built in ignitior. In terms of dwell control (spark firing time) these coils are combine elements of both self controlled / “smart coils” and externally controlled / “dumb coils”. They like the “dumb coils” will fire for as long as the duration of the activation of IGT signal from the ECU. However they will also fire to minimum dwell time regardless of how short the signal is triggered, this minimum duration is hard wired and can’t be altered.
Also of note that like all coils if the duration / dwell time is set for too long then the coils will have a heat build up and an prematurely fail.
Covering coilpacks
It is possible with some modification to fit the plastic spark plug lead cover of a 20V 4age Silvertop over NZ series coils, however it’s very much not recommended. All coilpacks need cooling to reliably function and if fitted under a non vented cover then it will drastically shorten their life. Although one option is to use the plastic cover from a 20V 4age blacktop and carefully modify it to have individual cut outs to fit over the same NZ coils. This blacktop cover can then be used on both the Silver and blacktop engines. An example of a 20V with a modified blacktop top cover and NZ coils is below. For all other engines it’s suggested to either do something similar, force feed air through the cover or leave it off completely.

Credit: Original photo owner unknown, if this is your photo then please contact us.
20V 4AGE coilpack conversion
The inside diameters of the spark plug tubes on a 20V engine are 24mm, however the outside diameter of the 1ZZ and NZ coils are close to 24.4mm at their widest. Therefore to physically fit these coils the outside diameter of their bottom half on needs to be reduced to suit. This can be done with the edge of a belt sander or even with the careful use of a file. Below shows an original coil on the left and post modification to the right.
Our 20V coilpack conversion plates are made to suit the type of coil as used on both the 1NZ and 2NZ engines, however an option is given to suit the type sourced from a 1ZZ-FE engine (not 2ZZ-GE). Both of these coil types function as well as each other and the difference is mostly physical. Pictured below is a NZ series coil on the left and a 1ZZ coil to the right.
Although there is no performance difference to either the NZ coils are generally considered to provide a neater look due to the plugs and leads being flat to the cover.
Coilpacks running from an original 20V 4AGE ECU
There has been quite a lot of discussion on running coils off the original 20V ECU. This concept works by using the original single ECU ignition output to fire all four fitted coilpacks at once. In theory this is not possible as one of the coils will always fire during the induction cycle. However it can be possible due to the fact that the fuel / air intake charge is not under compression and may not ignite. It is usually attempted as a cost saving measure as it avoids the need for a part such as our distributor kit for when an engine is mounted into a longitudinal / north-south lay out during a conversion. This method is problematic though as discussed below.
We have had quite a few technical requests to us here at SQ Engineering about this subject so we shall address our view of it. Some of these requests have been individuals who have this set up and are requesting advice in help to get it running as they had not been able to. One of these even had a professionally made harness sourced from a company who offers a custom loom for this exact conversion. So it seems that this method is a bit of a hit and miss affair so to speak. Even those who do manage to get this set up running run the high risk of regularly burning out the coils as they are being used 4x more often than their intended design. Therefore our unbiased opinion is against this method.
However even if we don’t suggest this for those who wish to still try this conversion then we suggest the following tips:
– Use the wiring diagram as shown here.
– Make sure the original coil and igniter are still connected and run a lead from the output of the coil and earth it to ground.
– Have the as much cooling around the coils as possible.
– Keep a spare coil and the tools in your car as a backup, note that to replace the #3 coil it may be required to remove the strut brace if one has been fitted to the vehicle.
Mounting
As shown in the previous pictures all of the Toyota coilpacks are secured via the use of a single mounting tab. To adapt this to other engines it can through various forms such as an adapter plate, bosses welded to the cam cover or even the friction of the coils in the tube.
Shown below is our adapter plate to suit the 4age 20V engines. We where the first in the world to offer such a part and happy to say that all these years later that they are still going strong. These are available from our store to suit both 16V 4age, 20V 4age and Mazda B-series engines.

4AGE Coilpack conversion part list
– Programmable ECU
– Coilpack mounting plate to suit either the 16V 4age or 20V 4age.
– Distributor blanking cover to suit either the 16V 4age or 20V 4age.
– Coilpacks.